
.webp)
The integration of a third party IdP will be accomplished by the Security Assertion Markup Language (SAML) open standard. Your SailPoint IIQ instance will request SAML from the third party IdP, and subsequently receive the SAML assertion for federated SSO. To get started with the SSO configuration, login to the SailPoint IIQ console with an administrator privileged account. After a successful login, click the gear icon in the upper right hand corner of the screen followed by selecting the “Global Settings” menu.
In Global Settings screen, select Login Configuration option in the page.

Select tab “SSO Configuration” in Login Configuration screen and then follow the steps below to configure the SailPoint IIQ server as the SP for a third party IdP.
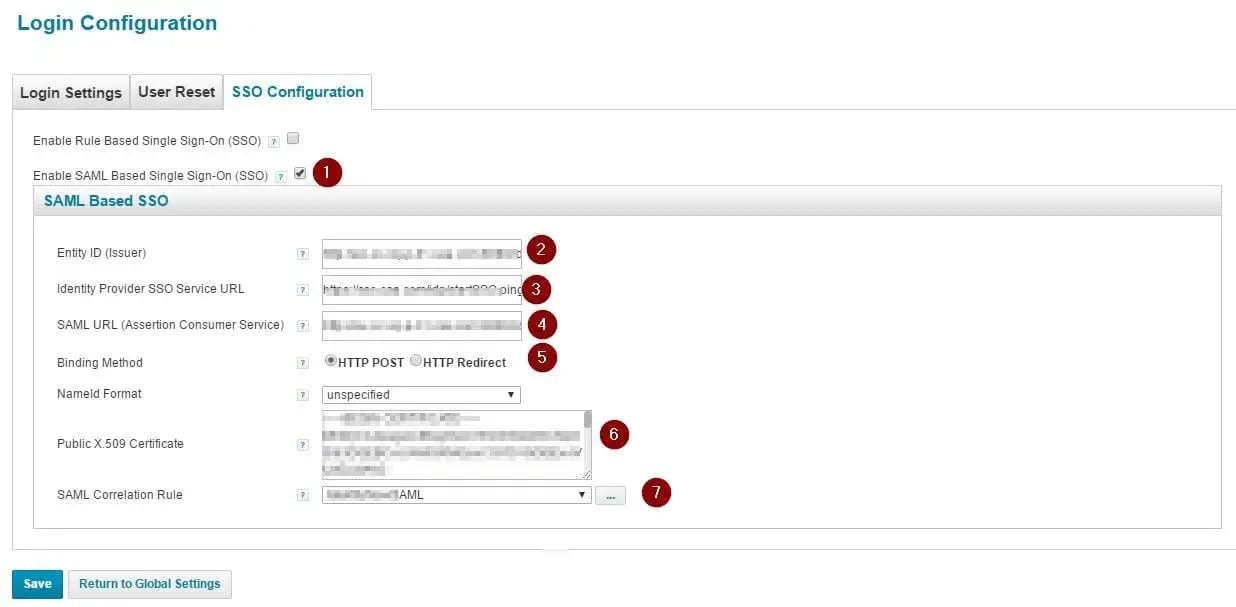
- Select the “Enable SAML Based Single Sign-On (SSO)” checkbox.
- Fill in the Entity ID (Issuer), which would be the unique identifier that defines your SailPoint IIQ instance. A common practice in SAML is to configure the Entity ID using domain name hosting the IIQ instance. For example, youriiq-server.yourdomain.com. The Entity ID is passed in the SAML request to the third party IdP server, where the third party IdP will process that value to know which service provider is requesting SSO.
- Fill in the Identity Provider SSO Server URL. This is the URL of the third party IdP server, mainly the endpoint that will process the SAML request sent by SailPoint IIQ.
- Fill in the SAML URL (Assertion Consumer Service). This is the SailPoint IIQ server endpoint that will receive the SAML response from the IdP. For example, https://youriiq-server.your-domainname.com:8080/identityiq/home.jsf
- For the Binding Method, select the appropriate communication scheme, either HTTP Post or HTTP Redirect. This value is generally agreed upon between the admin of the third party IdP and the admin of the SailPoint IIQ instance.
- For the Public X.509 Certificate, configure the digital signing certificate provided by the admin of the third party IdP. This is the certificate used to sign SAML responses for security of the SAML assertions.
- In SAML Correlation Rule, select/customize a rule to use to match a SailPoint identity with IdP results. Sample correlation rule as below.
//Get the attribute from assertion, which will be used to search in IIQ.
//In this sample, the attribute name from assertion is nameId, that's the value of email address which is configured in IdP.
String email = (String)assertionAttributes.get("nameId");
//Use that attribute to search in IIQ to find the matching identity object.
//You can add/customize whatever logic you want to be applied here
Identity identity = yourSearchFunction(email);
//return the identity object in this rule
return identity;
By following these steps SailPoint IIQ SSO should be configured. The configuration of the third party IdP will also need to be performed to ensure success of the interface. Once completed all subsequent access to the SailPoint console will negotiate SAML with the third party IdP, where the third party IdP authenticates the users. In the event there is a need to bypass SSO, this can still be accomplished by using the prompt query parameter as follows: https://youriiq-server.your-domainname.com:8080/identityiq/login.jsf?prompt=true. Using this query parameter will cause SailPoint to land on the native login screen.
I hope you found this article helpful to assist with tips to integrate SailPoint with a third party SSO product using SAML. If you have comments or questions, please contact us!