
.png)
ProofID Technical Consultant, Theo Chimbga provides instructions on how to configure Lightweight Directory Access Protocol (LDAP) integration between Okta and an Active Directory Lightweight Directory Services (AD LDS) instance. AD LDS is Microsoft’s implementation of the LDAP open standard. The how-to instructions in the Okta LDAP Agent Deployment Guide are very good but there are a few perils that could catch out first-timers.
We’re going to assume here that you already have AD LDS installed and configured with at least one directory partition as illustrated below. According to Okta guidelines, the LDAP agent configuration in a production scenario should be on an always-on server with permanent Internet connectivity.
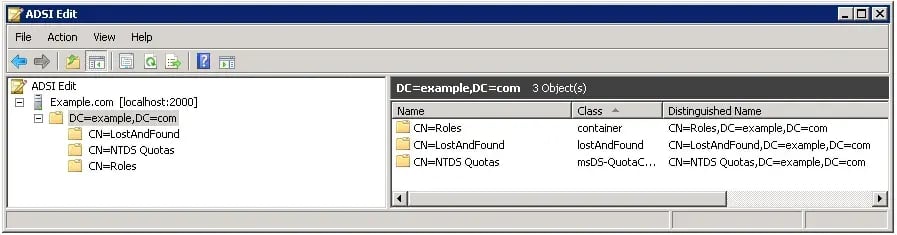
In my example, I’m using the fictitious Example.com company, whose root distinguished name (DN) is DC=example,DC=com. My instance is using local port 2000, which can be left at the default 389 if the instance is not on a domain controller (DC).
We will be using Microsoft’s ADSI Edit utility to manage the instance but you can use any other utility of your choice, such as Tihomir Karlovic’s LDAP Admin. You can also leverage the Active Directory PowerShell module if available but the instructions for that are for another day.
Create a service account
First thing is to configure a service account that will be used by Okta to query your AD LDS instance. This is not mandatory if you already have a suitable account set up. It is however important to note that a new instance will not have any accounts at all so it is vital that you set one up or you will not be able to complete the LDAP agent installation. The Okta documentation mentions that you need an account that has rights to query LDAP but does not go into detail about how to create this.
Use the steps below to create and assign permissions to the service account, skipping the creation of the container if not required. These steps are specific to ADSI Edit on a new AD LDS instance.
1. Expand the node with the server icon, right-click the top domain (labelled DC=…) then select New | Object.
2. Select organizationalUnit from the list, click Next and type Service Accounts and click Next then Finish.
3. Right-click the new OU=Service Accounts node and select New then Object.
4. Select user in the list, click Next then type svc-okta (or another account name of your choice) in the Value field and click Next then Finish.
Note: The new account is in a disabled state by default and cannot be enabled without setting a password first.
5. Right-click the new user account in the right pane of the Service Accounts OU, select Reset Password and set a suitably complex password to be kept securely then click OK.
6. Right-click the service account again, select Properties, then scroll down to the msDS-UserAccountDisabled attribute and click Edit. Select the False radio button on the Boolean Attribute Editor property page and click OK followed by Apply.
7. Click Filter and if necessary click System-only in the Show read-only attributes section so that there is a check mark against the menu option.
8. Select distinguishedName in the Attributes list, click View then copy the DN, which should be like: CN=svc-okta,OU=Service Accounts,DC=example,DC=com and click Cancel then OK.
Note: If the attribute does not appear in the Attributes list repeat the previous step.
9. Click on CN=Roles in the left pane then right-click CN=Readers in the right-pane and select Properties.
Note: The Readers role is sufficient for read-only access but you may perform the above step on the Administrators role if you require more permissions for the service account.
10. Select member in the Attributes list then click Edit, followed by Add DN. Paste the service account DN copied into the clipboard earlier and click OK thrice to save the changes.
11. Proceed to the next section without exiting ADSI Edit.
Create a test user account
The following steps allow you to set up a test account that will be used to validate the LDAP agent installation. This is not essential if you already have existing user accounts but is recommended to ensure we perform the initial setup with an account that is known to be configured correctly. The steps assume a new AD LDS instance so you can skip creating the OU structure if not required.
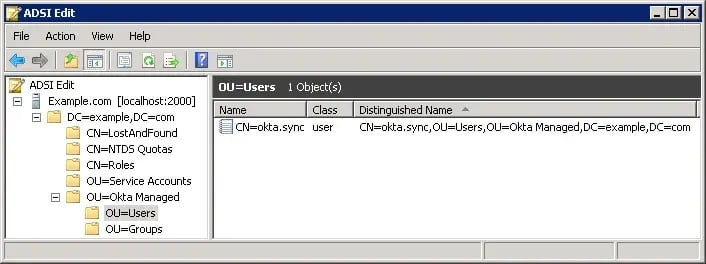
1. Use the procedure described previously to create a top level OU called Okta Managed, or another suitable name.
2. Right-click the new OU and create an OU called Users.
3. Right-click the top OU again and create an OU called Groups, if required.
4. Right-click the OU=Users node and select New then Object.
5. Select user in the list, click Next then type sync in the Value field and click Next followed by Finish.
6. Set a suitable password on the account and enable it using the procedure described previously. The AD LDS instance should be looking like below in ADSI Edit:
At this point it is worth recalling that a minimum of four values are required in order to create a user object in the Okta Universal Directory, and these are; first name, last name, account name (in email format) and email. The LDAP agent configuration allows you to specify an email address or “User ID” to create Okta usernames. What it doesn’t stress is that “User ID” refers to the AD LDS uid attribute, which has a null value by default when a user object is created via ADSI Edit.
7. Right-click the sync user object, select Properties then set the attribute values listed in the table below and click OK to save the changes. If you cannot see all attributes, click the Filter button and deselect Show only attributes that have values.
[fusion_table fusion_table_rows=”5″]
| Attribute name | Attribute value |
| givenName | Okta |
| okta.sync@example.com | |
| sn | Sync |
| uid | okta.sync |
| [/fusion_table] |
NB: Use a mail suffix applicable to your environment.
Create a test group object
The steps in this section are optional and only necessary if you intend to use the LDAP agent to sync groups to Okta. The objective is to create a test group and assign the test user account as a member.
1. Right-click the OU=Groups node and select New | Object. Select group in the class list and click Next.
2. Type Example Okta Group in the cn Value field and click Next then Finish.
3. Left-click the OU=Users node then right-click the CN=okta.sync user object and select Properties. Select distinguishedName, click View and copy the user DN then cancel out.
4. Select the OU=Groups node again then right-click the CN=Example Okta Group object and select Properties. Select the member attribute and click Edit, using the Filter button if the attribute is not listed.
5. Click Add DN, paste the DN of the test user in the Add Distinguished Name (DN) property page and click OK thrice to save the changes.
Install and configure the Okta LDAP agent
Now that we have set up our AD LDS instance, it is time to fire up the installation of the Okta LDAP agent. The Okta LDAP Agent Deployment Guide is sufficiently detailed so you’re unlikely to run into problems in the first part, provided you use the details created in the preceding sections. I’ll give pointers on the bits to watch out for when you come to verify the configuration as that is where you’re most likely to be caught out.
1. Log in to your Okta tenant from a browser on the same machine as AD LDS, using super user credentials and click on Directory then Directory Integrations on the dashboard.
2. Click Add Directory and select Add LDAP Directory then scroll to the bottom and click on Set Up LDAP.
3. Click Download Agent and select Download EXE Installer then save or run the file, depending on your browser. While waiting for the download, note the Okta Organization and administrator account details displayed and if you wish copy them to Notepad.
4. If the installation does not start automatically browse to your Downloads folder and double-click the executable file. The shortcut Ctrl+J will show the downloaded file in most browsers.
5. Click Next on the welcome page and Next again on the license page then Install, unless you wish to specify a different target folder, in which case you should type it first.
6. Complete the LDAP configuration page using the details created in previous steps, similar to the example below and click Next. Copy and paste long values to minimise typo issues.
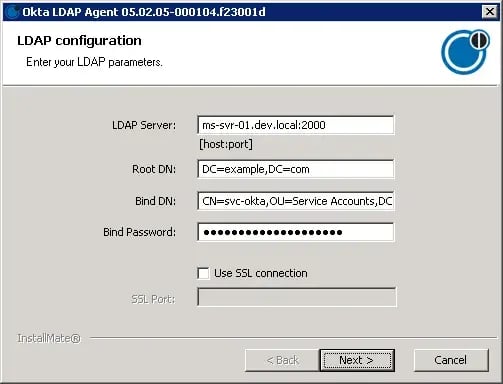
Note: Refer to the Okta documentation if you’re using SSL to connect to AD LDS.
7. Click Next on the Proxy Configuration page, unless your server connects to Internet via a proxy, in which case you should configure the proxy server and credential details first.
8. Enter the full URL of your Okta tenant on the Register Okta LDAP Agent page, in the form: https://example.okta.com and click Next. This is the value displayed on the download page.
9. Sign in using your super user credentials on the agent service account page and click Allow Access. All being well, click Finish after the registration completes successfully.
10. Back in the browser navigate back to the Directory Integrations page if necessary and click on the new entry.
It is here that you might run into problems because at the time of writing the Okta template for AD LDS has a few issues. Having done this write-up on Windows Server 2008 R2, I’m not sure whether the issues affect other versions of AD LDS out there.
Firstly, the distinguishedName attribute is suggested as a unique identifier, which is inaccurate as the DN of an object will change if it is moved between OUs. To be fair, the Okta documentation advises to use objectGUID but you have to go searching to find this out.
Secondly and more seriously, the template uses identityperson as the class for the user object. There is no such object class in AD LDS, with the valid values being top, person, user and organizationalPerson. Using the identityperson object class returns an error of the form: User not found while executing query: (&(objectclass=identityperson)(uid=joe.blogg@example.com)). You also get this error if the service account is not assigned the correct permissions.
The final possible gotcha is that the Okta terminology “User ID” in the context of usernames is not obvious that it refers to the uid attribute. It’s easy for someone from an AD DS background to expect the account name to be derived from a mandatory attribute that is always populated at user object creation. Thinking about it, I can understand the logic since attributes like cn are not truly unique as two users can have the same cn, so long as they are in different OUs. Similarly, AD LDS does not have a sAMAccountName attribute (unless you extend the schema) so the concept of “unique account name within the same domain” which works in AD DS does not apply. In short, your AD LDS instance needs to provide a value for the uid attribute of each user. You need to consider how to manage this as AD LDS won’t prevent you from assigning the same uid to multiple users.
Now that we’ve covered the potential pitfalls, let’s complete the configuration!
11. Select Microsoft AD LDS from the LDAP Version dropdown list.
12. Type objectguid in the Unique Identifier Attribute field, replacing distinguishedname.
13. Paste the DN of the parent OU for user objects in the User Search Base field or leave it blank if you have user OUs hanging off the root of the LDAP tree. For instance, in my example the value would be: OU=Users,OU=Okta Managed,DC=example,DC=com.
14. Type organizationalperson in the Object Class field, replacing the identityperson
15. Replace identityperson with organizationalperson in the User Object Filter field so it becomes: (objectclass= organizationalperson).
Note: You might be tempted to replace identityperson with user above as that looks reasonable for the user object, but I found out this won’t work, after a lot of pain.
16. Paste the DN of the parent OU for group objects in the Group Search Base field if required. In my example this would be: OU=Groups,OU=Okta Managed,DC=example,DC=com.
17. Select Email address in the Okta username format dropdown list then type the email address of the test user in the Example username field. In my case this would be okta.sync@example.com, as shown in the screenshot below:

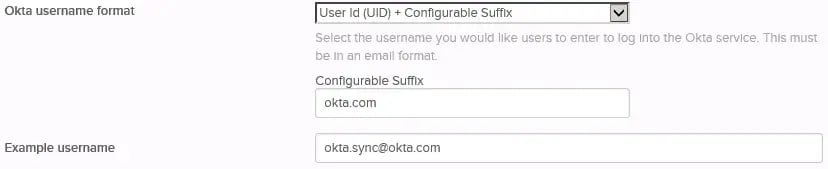
Note: In the real world you might chose to use the value of the uid attribute as explained previously, combined with a routable domain suffix. For such a scenario, select User Id (UID) + Configurable Suffix, then fill in the desired suffix as illustrated below:
18. Click Test Configuration and do a little dance as you get a success confirmation similar to:
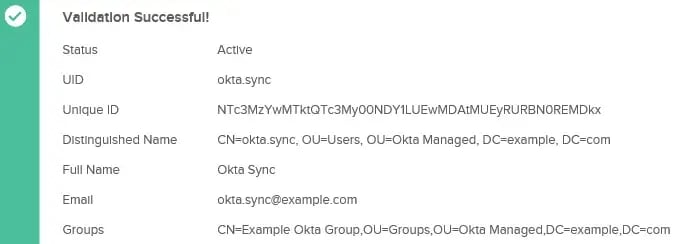
Note: In the above example the group membership is listed because I made the test user a member of the test group.
19. Click Next and Done at the LDAP is now integrated with Okta screen to complete the setup.
20. The next steps involve configuring mappings between the AD LDS users and groups with the same objects in Okta. You will also then go on to confirming and activating user accounts, which I will leave for a future article.
This article has provided instructions on how to configure the Okta LDAP agent to work with Microsoft AD LDS. For illustration purposes I used the non-routable example.com domain suffix but the principles are applicable to other situations. In a production scenario, it is normal to have some sort of identity management (IDM) system to take care of the lifecycle of objects in AD LDS. Such solutions range from something as simple as PowerShell scripts running on schedule to full-fledged solutions like Microsoft Identity Manager.
It goes without saying that you should document all the various bits of information that were used during the configuration and store them securely according to the prevailing standards in your environment. This is not only good practice but you can guarantee that two months down the line you won’t remember any of the details, particularly if you have used complex passwords!
.png)